
Using EQ (equalization) when you’re mixing a song is frustrating if you don’t understand what you’re doing.
- What do you do first?
- Should you boost or cut?
- What frequencies should you focus on for your vocals or your instrumental tracks?
- How do you make things sound better instead of worse?
If you’re faking it, you’ll waste a lot of time and end up making your song sound worse.
In this article, you’ll learn how to adjust the EQ quickly to make tracks sound better instead of worse. You’ll understand the concepts behind EQ and know a process to find the best EQ for any vocal or instrumental track.
Below the video lesson is a written summary, bonus EQ tips and links to other articles!
Equalization: General Principles
- Start with great recordings and you’ll have lees to do in the mixing phase.
- Edit your tracks before you mix so you can focus on mixing instead of fixing the tracks.
- Less is better… it’s faster and usually sounds better to use a minimum of EQ changes.
- If it’s a fight… you’re probably trying to fix a problem you created or should have solved in the recording phase.
- Mix in context. Spend most of your time setting EQ for a track while hearing it with other tracks, so they sound good together. I set the EQ for the acoustic guitar on its own so you could better hear the effects of each change. In a regular mix, I’d EQ the acoustic guitar in the context of the voice or with other instruments on a more complicated mix.
- What worked in this song won’t work for every mix. I set the EQ on the guitar and vocal tracks so that it made sense to me with this small arrangement. You would likely make different choices with the same song. In the video, I boosted the high end of the acoustic guitar. This is usually filled by cymbals, so I wouldn’t likely boost there if there was a drum kit in the mix.
- The more in the mix, the more to mix. When there are more instruments in a song, balancing the EQ between different instruments so you can hear all of them becomes more complicated.
- Copy the EQ process, not the final setting!
Two Ways to Use EQ:

1. Additive EQ – Boosting Good Sounds
Increasing some areas of the audio spectrum to emphasize good things you’re hearing. This is the more common approach because it intuitively makes sense. It works, but I focus first on…
2. Subtractive EQ – Cutting Bad Sounds
When you reduce the level of a region that sounds bad or is louder than other areas… you can turn the entire track louder!
First you reduce what you don’t like in the sound, then turn it up…
Finding the Frequencies
Much of the confusion around EQ is because musicians are used to talking about notes and intervals, instead of frequencies.
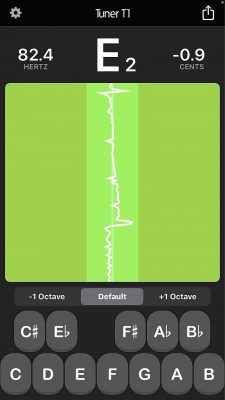
A note has a name and register (which octave it’s in) as well as a frequency. Low E (E2) on your guitar is 82Hz. For simplicity, let’s call it 80Hz.
Doubling the frequency moves up an octave.
So if E2 = 80Hz
E3 = 160Hz
E4 = 320Hz (actually 329.6Hz)
E5 = 640Hz (actually 659.3Hz)
E6 = 1280Hz (actually 1318.5Hz)
E7 = 2560Hz
E8 = 5120Hz (about 5kHz)
E9 = 10240Hz (about 10kHz)
E10 = 20480Hz… (just above 20kHz) probably higher than you can hear it.

Other Notable Frequencies:
Tuning note A4 = 440Hz
Middle C on the piano is C4=261Hz
Lowest note on the treble clef E4=329.6Hz
Highest note on the treble clef F5=698.5Hz
Give yourself a better sense of the frequencies you’re EQing by playing with a tuner app that also shows frequencies in Hertz. I use Tuner T1 (for iOS). It has a free version, but I use it often so I paid $3 to remove the ads and support the app developer. Use any tuner app that you like.
Mixing EQ for Guitar

- Check the range of the notes you’re playing for this song. EQing higher frequencies affect the tone of the instrument. The highest guitar note in this song was around 460Hz, any higher frequencies are overtones.
- Low E is 80Hz. Roll off everything below 75Hz with a high pass filter (only sounds higher than the filter frequency are allowed through)… any sounds down there are background noise. Just get rid of them.
- Sweep for sounds to reduce using a 6-12dB boost with a relatively narrow EQ. As you get experience with this technique, you won’t need a large boost.
- You will hear bad things because boosts larger than 6dB sound unnatural. The point is to emphasize a small section of the frequency spectrum to listen for ranges that sound more ugly than everything else. Those are the spots to cut the EQ.
- If you hear something you don’t like, return to it and try a 3dB cut. Make the EQ change as small as possible while still improving the sound. Narrow the Q (range of frequencies) to as small as you need. Try a slightly larger or smaller cut and stick with the best sounding choice.
Mixing EQ for Vocals
I start with a De-Esser plugin to eliminate harsh consonants with, then EQ with a graphic equalizer.

Using a De-esser
A de-esser (literally = removes “S” sounds) is a plugin that reduces sibilance (harsh consonant sounds), usually between 3kHz-7kHz without changing sounds in that range when those consonant sounds aren’t present. The de-esser in the video can reduce sibilance anywhere between 2kHz-10kHz.
It’s a specialized compressor that reduces sounds at a narrow frequency range when they get too loud. It otherwise doesn’t change the tone of the track by cutting those frequencies all of the time (the way an EQ would).
I set a de-esser before adjusting vocal EQ because I prefer to eliminate unwanted sounds before adding other processing (it’s more elegant than processing an unwanted sound, then removing it).
De-essing: Step by Step
- Solo the vocal track and switch the de-esser to “Listen” so you only hear the sounds it will remove.
- Turn up the depth (the amount it removes) to maximum to make it easier to find the harshest consonant sounds.
- Tune the frequency to get rid of most of the consonants.
- Then turn the depth back down.
- Compare the track with the de-esser on and off to ensure you’ve made a positive difference.
For a starting point to set a de-esser, you can check your consonants with a Tuner app that also displays frequencies in Hz, as I did in the video.
Setting the EQ for Vocals
- Listen to the vocals with the rest of the mix. Creating a great EQ for the vocal on it’s own doesn’t mean it will sound good in the mix.
- Roll off any frequencies below your lowest note in the song.
- Sweep for sounds to eliminate with a 6-12dB boost with a relatively narrow EQ, just as with the guitar above.
- Boost 3kHz +- 200 Hz (sweep to check) by 2-4dB to emphasize the Singer’s Formant which helps the vocal part be heard through other instruments in the mix.
EQ Presets

Messing around with presets is a good way to learn how your EQ affects the sound.
You can use presets as a starting point, but don’t expect them to work “as is” or in every situation.
Each preset has a specific purpose, don’t expect a preset for vocals to work on a guitar or snare drum.
Some presets aren’t very good… they might not work well on anything.
I prefer to start with a fresh plugin and choose my own settings by following the process I showed you and trusting my ears (and using my eyes on the graphic EQ as backup)
When you find EQ settings you really like, save them as your own preset!
So you can use them on for another track in the same mix (either as is or as a starting point), for your next mix, or so you can experiment with it without worrying about making a mistake and losing the great sound you just found!
In Cakewalk you can save settings on a single plugin as a preset… and even save a preset for the entire signal chain in the ProChannel.
EQ Terminology

Frequency – vibrations per second, measured in Hertz (100Hz = 100 vibrations per second). 1kHz = 1000 Hz
Frequency Spectrum – fancy talk for “all the sounds we can hear, from low to high sounds”
Audio Spectrum – the range of human hearing, generally considered to be from 20Hz to 20kHz. As people age, their ability to hear higher sounds is reduced.
Additive EQ – increasing the volume of good sounding frequencies in a track.
Subtractive EQ – decreasing the volume of bad sounding frequencies in a track.
Decibel (dB) – measurement of sound volume, more dB is louder. In your DAW, 0dB is as loud as possible, -12dB is 12dB softer than 0dB.
Filter (audio filter) – a processor that increases or decreases the relative loudness of certain frequencies (https://en.wikipedia.org/wiki/Audio_filter)
Band – one filter in an EQ plugin
Boost – increasing the volume (loudness) in a band
Cut – decreasing the volume (loudness) in a band, also called attenuate/attenuating.
Q – how wide a band is in an EQ plugin. Some plugins allow you to change to width of the Q in each filter
High Pass Filter – allows frequencies through above a set frequency, also called a low cut filter because it cuts out low sounds
Low Pass Filter- allows frequencies through below a set frequency, also called a high cut filter because it cuts out low sounds
Sibilance – harsh consonant sounds, usually ranging between 2.5kHz – 7kHz
Plosives – “explosive” sounds that people make with hard puffs of air as we speak or sing. Hard consonants like “K” “B” “Ssh” and “Sss”. Plosives can be reduced in the recording phase with a pop shield in front of a microphone, and in the mixing phase with a De-Esser.
De-Esser – a specialized compression plugin that reduces the sound of sibilance by cutting specific frequencies when they are too loud but otherwise not affecting them. I accidentally called it an EQ in the video, it’s a compressor.
Mixing With EQ – Summary

- Start with great recordings
- Edit your tracks before you mix
- Less is better… use EQ to shape the sound, not “fix” it (unless you’re trying to create an effect)
- Less sounds better… 3dB boosts and cuts are usually enough unless you’re trying for a special effect.
- If it’s a fight… consider recording it again.
- Mix in context more than solo.
- What worked in this song won’t work for every mix
- Copy the EQ process, not the final settings!
